Your garden is drowning in blackberries and the neighbours are refusing to take any more. The freezer is full, you’ve made enough crumble to last until Christmas, and the birds are getting fat. What most people don’t realise is that those surplus berries, apples, plums, and even rhubarb can become proper wine — and not the questionable stuff your granddad used to make in the airing cupboard. Done right, homemade fruit wine is genuinely good.
In This Article
- Why Garden Fruit Makes Great Wine
- Which Fruits Work Best
- Equipment You Need
- The Basic Fruit Wine Process
- Step-by-Step: Blackberry Wine Recipe
- Adjusting Sugar and Acidity
- Fermentation and Racking
- Common Problems and Fixes
- Blending and Flavour Combinations
- Bottling and Ageing
- Frequently Asked Questions
Why Garden Fruit Makes Great Wine
Commercial fruit wines have a reputation problem — cheap, overly sweet, and a bit naff. But wine made from properly ripe garden fruit, with controlled fermentation and decent technique, can be excellent. Blackberry wine aged for a year develops a depth that surprises people who expect it to taste like Ribena. Elderflower wine chilled on a summer evening is as refreshing as any Sauvignon Blanc.
The advantage of garden fruit is freshness. Commercial fruit is picked, transported, stored, and handled before you get it. Your garden fruit goes from bush to fermenter in hours. That freshness translates into more vibrant flavour and better aroma in the finished wine.
There’s also something satisfying about the self-sufficiency of it. The fruit is free, the process is simple once you understand it, and the result is something you made entirely from what was growing in your garden. After three years of making wines from whatever the garden throws at me, I can say the learning curve is gentle and the results get better every year.
Which Fruits Work Best
Best for Beginners
- Blackberries — abundant, free (hedgerows too), high in natural tannin and colour. Makes a rich, port-style wine. Probably the single best fruit to start with
- Apples — makes a crisp, dry wine similar to a light white. Use a mix of eating and cooking apples for balance. Our guide to country wine recipes includes a classic apple wine method
- Elderflowers — technically flowers, not fruit, but the process is the same. Makes a delicate, floral wine that’s ready to drink within 6 months
Good Once You’ve Got the Basics
- Plums — sweet, aromatic, and high in natural sugar. Victoria plums make a lovely dessert wine
- Gooseberries — tart and acidic, perfect for dry white-style wines. One of the closest garden fruits to grape wine in character
- Rhubarb — the sheer quantity most gardens produce makes this a practical choice. Very tart on its own, so it benefits from blending or higher sugar levels
- Damsons — intense flavour, dark colour, excellent for rich winter wines
Worth Trying
- Strawberries — light, aromatic, but the flavour can be delicate and fade. Best as a rosé-style wine
- Raspberries — similar to strawberries but with more structure. Makes a beautiful pink wine
- Pears — perry (pear cider) is more traditional, but pear wine works too. Choose ripe, sweet varieties
- Cherries — morello (sour) cherries make far better wine than sweet dessert cherries
Fruits to Avoid or Handle Carefully
- Citrus — too acidic on their own. Use small amounts for blending or flavouring
- Bananas — surprisingly useful as a body-builder in other fruit wines, but banana wine itself is an acquired taste
- Any fruit with visible mould or rot — sounds obvious, but “cutting off the bad bit” isn’t enough. Mould spores spread through soft fruit
Equipment You Need
You don’t need specialist equipment to start. Most of it is available from home brew shops like The Malt Miller, Brew2Bottle, or BrewUK, and from Amazon UK.
Essential
- Fermentation vessel — a food-grade plastic bucket with lid (about £8-12 for 25 litres). You’ll need this for the primary fermentation. Our fermentation vessel guide covers the options in detail
- Demijohn — a glass or plastic 4.5-litre vessel with a narrow neck. This is where the wine goes for secondary fermentation and clearing. About £5-8 each — buy at least two
- Airlock and bung — fits in the demijohn neck, lets CO2 escape without letting air in. About £1-2
- Siphon tube — for transferring wine between vessels without disturbing the sediment. About £3-5
- Hydrometer — measures the sugar content (specific gravity) of your wine. Essential for knowing when fermentation is complete and calculating alcohol content. About £5-8
- Steriliser — sodium metabisulphite powder or a no-rinse sanitiser like Star San. Everything that touches the wine must be sterilised. About £3-5
Useful but Not Essential
- Fruit press or muslin bag — for extracting juice from the fruit pulp. A muslin bag (about £3) does the job for small batches
- Acid testing kit — measures the acidity level so you can adjust before fermentation. About £5-8
- Pectic enzyme — breaks down pectin in the fruit, which helps the wine clear. About £3 for a year’s supply
- Wine bottles and corks — save empty wine bottles and buy new corks (about £8 for 30). A basic corking tool costs about £10-15
The Basic Fruit Wine Process
Every fruit wine follows the same fundamental steps, regardless of which fruit you’re using. Once you understand this process, you can adapt it to any fruit your garden produces.
Overview
- Prepare the fruit — wash, chop, remove stones/stems, crush lightly
- Create the must — combine fruit with sugar, water, and additives in the primary fermenter
- Add yeast — pitch wine yeast and let primary fermentation run for 5-7 days
- Strain and transfer — remove the fruit pulp and transfer the liquid to a demijohn
- Secondary fermentation — let the wine ferment slowly under airlock for 4-6 weeks
- Rack — siphon the clear wine off the sediment into a clean demijohn
- Clear and stabilise — wait for the wine to clear naturally, rack again if needed
- Bottle — when the wine is completely clear and stable, bottle it
- Age — most fruit wines benefit from at least 3-6 months in bottle before drinking
The whole process takes about 3-6 months from fruit to drinkable wine, with most of that being waiting rather than working.
Step-by-Step: Blackberry Wine Recipe
This makes about 4.5 litres (6 standard bottles) of medium-bodied blackberry wine at approximately 12-13% ABV.
Ingredients
- 1.8kg fresh blackberries — ripe, no mouldy or underripe berries
- 1.2kg granulated sugar — ordinary white sugar is fine
- 4 litres water — tap water is usually fine unless your water is heavily chlorinated (in that case, leave it standing overnight or use filtered water)
- 1 tsp citric acid — or the juice of 2 lemons
- 1 tsp pectic enzyme — helps the wine clear
- 1 sachet wine yeast — a general-purpose wine yeast like Gervin GV1 or Lalvin EC-1118
- 1 tsp yeast nutrient — feeds the yeast for a clean fermentation
- 1 Campden tablet (sodium metabisulphite) — sterilises the must before adding yeast
Method
- Sterilise everything — bucket, spoon, demijohn, airlock. Use sodium metabisulphite solution or Star San. This is the most important step — contamination ruins wine
- Wash the blackberries — pick through them, discard any mouldy or hard berries. No need to remove the tiny stems
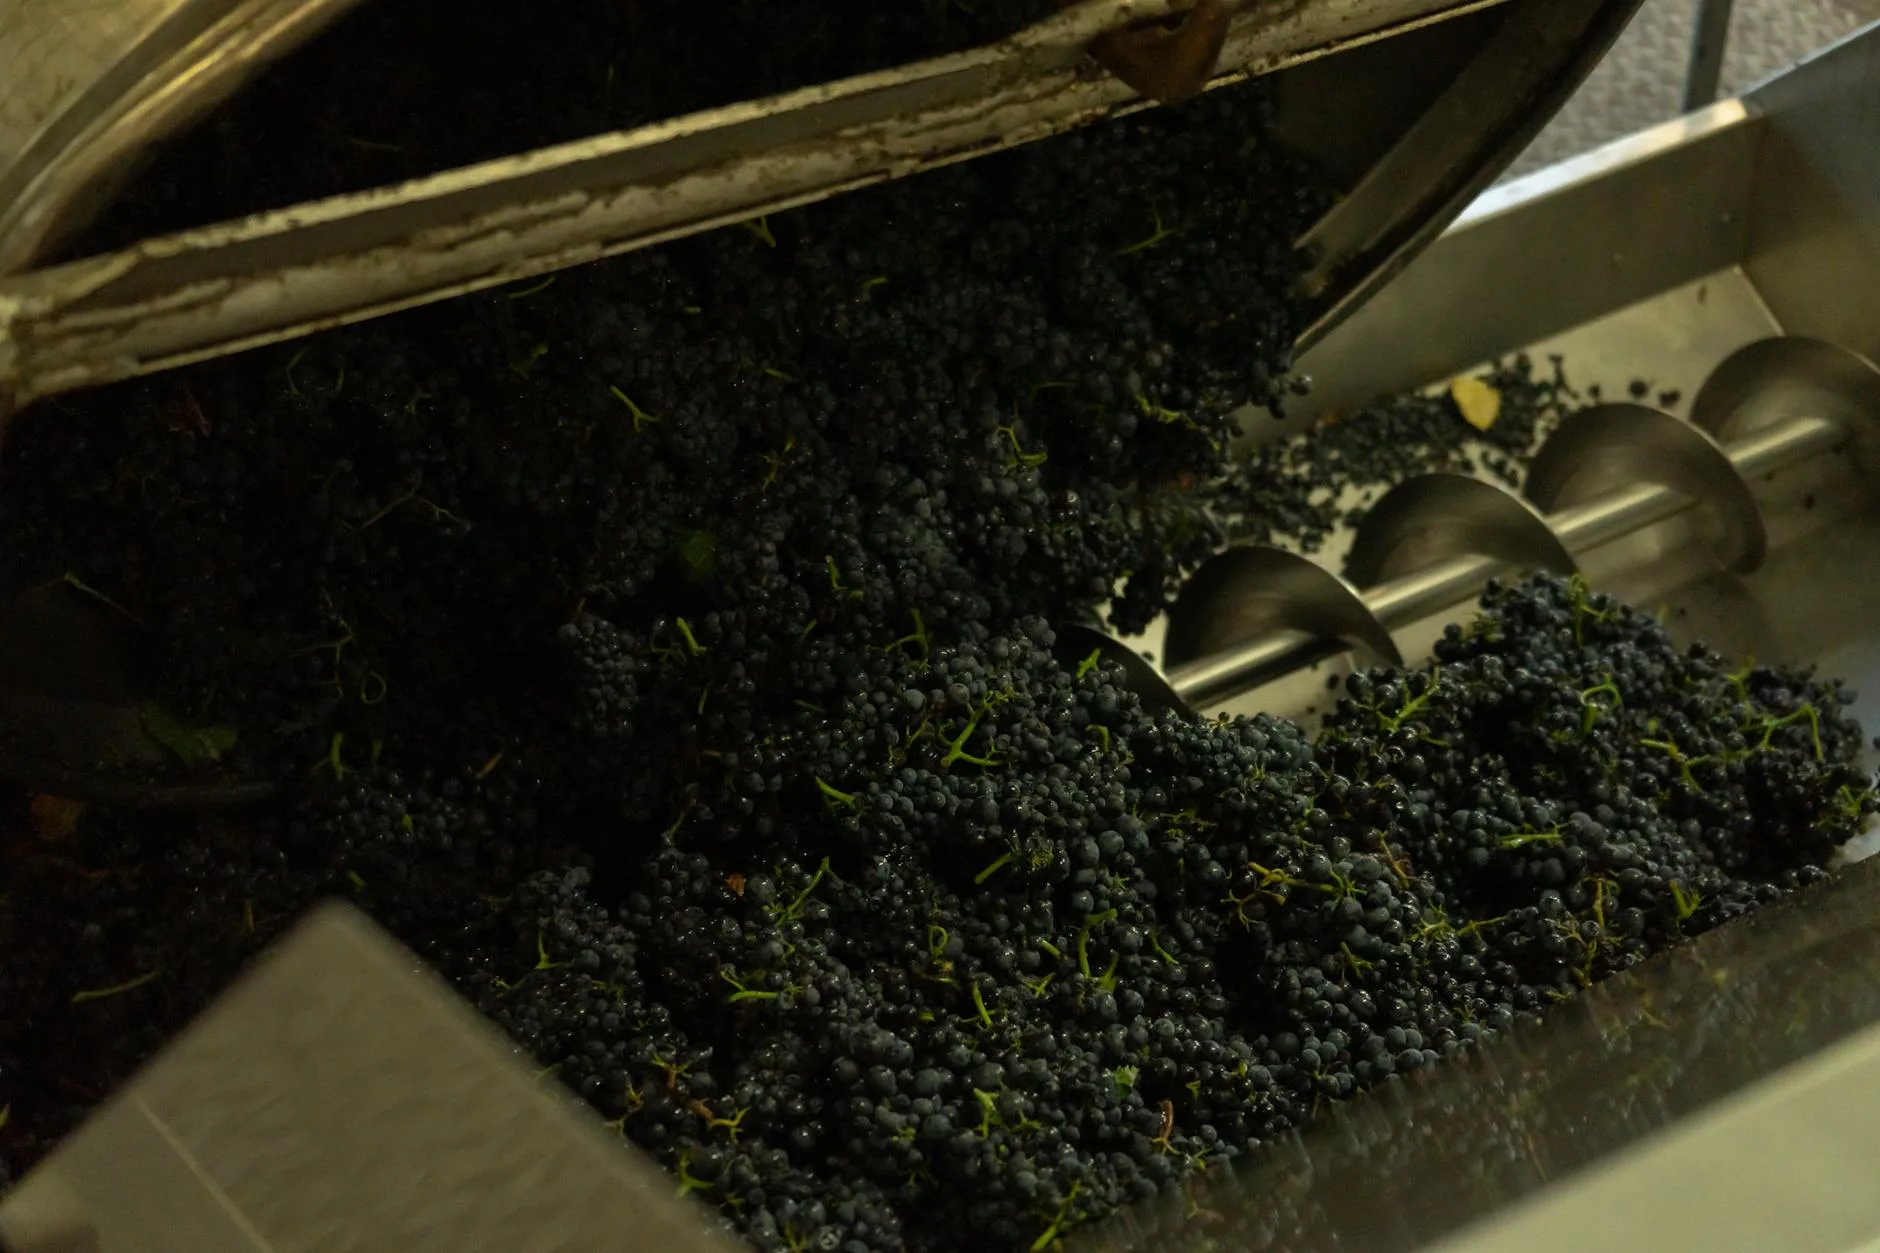
- Crush the fruit — place in the sterilised bucket and crush with a potato masher or clean hands. You want the berries broken but not pulverised
- Boil the water and dissolve the sugar in it. Let it cool to about 20°C
- Pour the sugar water over the crushed fruit
- Add citric acid, pectic enzyme, and a crushed Campden tablet. Stir well
- Cover and wait 24 hours — the Campden tablet kills wild yeast and bacteria. The pectic enzyme needs time to work
- Add yeast and yeast nutrient. Sprinkle the yeast on top — no need to rehydrate most wine yeasts, though the packet instructions will tell you if it’s needed
- Cover loosely and leave in a warm place (18-24°C) for 5-7 days, stirring once daily. You’ll see vigorous bubbling within 24-48 hours
- Strain the liquid through a sterilised muslin bag into a sterilised demijohn. Squeeze the bag gently — don’t force it, as that pushes through bitter compounds
- Fit the airlock — fill it with water or sanitiser solution. The wine will bubble through it as CO2 escapes
- Leave for 4-6 weeks — the bubbling will slow and eventually stop as fermentation completes
- Rack — siphon the clear wine off the sediment into a clean demijohn. Try not to disturb the sediment layer
- Wait another 2-3 months — the wine will continue to clear. Rack again if a significant layer of sediment forms
- Bottle when the wine is clear and stable (no more bubbling, hydrometer reads below 1.000)
Tips from Experience
The first time I made blackberry wine, I squeezed the muslin bag like I was wringing out a flannel. I’ve since learned that most winemaking mistakes come from impatience rather than ignorance. The result was bitter and cloudy. Gentle squeezing — or no squeezing at all, just letting gravity drain it — gives a much cleaner wine. Patience at this stage saves weeks of clearing later.
Adjusting Sugar and Acidity
Sugar
Sugar determines alcohol content. More sugar = more alcohol (up to the yeast’s tolerance, usually 14-16% for wine yeast). Use a hydrometer to measure:
- Starting gravity of 1.080-1.090 → approximately 11-12% ABV (light, drinkable)
- Starting gravity of 1.090-1.100 → approximately 12-13% ABV (medium, most versatile)
- Starting gravity of 1.100-1.120 → approximately 13-16% ABV (full-bodied, ages well)
If your must is too low in sugar, add more dissolved sugar in small amounts and re-measure. If it’s too high, add water. Our gravity readings guide explains the maths in detail. For a related angle, see our Fruit Wine Flavour Profiles: What to Expect guide.
Acidity
Fruit wines need the right acid balance to taste lively rather than flat. Too little acid and the wine tastes flabby and dull. Too much and it’s sharp and unpleasant.
An acid testing kit measures total acidity in grams per litre. Target ranges:
- Dry white-style wines (apple, gooseberry): 6-8 g/L
- Red-style wines (blackberry, damson): 5-7 g/L
- Sweet wines (plum, strawberry): 7-9 g/L (higher acid balances the sweetness)
Citric acid or tartaric acid raises acidity. Precipitated chalk (calcium carbonate) lowers it. Adjust before fermentation, not after — it’s much harder to fix the balance in finished wine.
Fermentation and Racking
Primary Fermentation (Days 1-7)
This is the vigorous stage. The yeast is multiplying rapidly and consuming sugar. You’ll see enthusiastic bubbling, a layer of foam on top, and the must will smell strongly of yeast and fruit. Stir daily to keep the fruit pulp submerged and prevent mould forming on any exposed surface.
Temperature matters. Too cold (below 15°C) and fermentation stalls. Too warm (above 28°C) and the yeast produces off-flavours — harsh, solvent-like notes that don’t age out. The sweet spot for most wine yeasts is 18-22°C. A spare bedroom or kitchen cupboard usually works.
Secondary Fermentation (Weeks 2-6)
Once you’ve transferred to the demijohn, the fermentation slows. Bubbles come through the airlock every few seconds initially, then every minute, then every few minutes. This is normal — the yeast is running out of sugar.
Leave the demijohn in a stable, cool location (15-18°C is ideal). Avoid direct sunlight and temperature swings.
Racking
Racking means siphoning the clear wine off the sediment (lees) that settles at the bottom. The lees are dead yeast cells and fruit particles — leave the wine on them too long and they can give off unpleasant flavours. Our How to Make Elderflower Wine: A Classic Country Recipe guide is useful alongside this.
- First rack: after primary fermentation (2-3 weeks)
- Second rack: 6-8 weeks later, or when significant sediment has formed
- Third rack (if needed): before bottling, to ensure the wine is completely clear
When racking, keep the siphon tube above the sediment layer. Tilt the demijohn gently to get the last clean wine without sucking up lees. You’ll lose about 5-10% of volume each time — this is normal.
Common Problems and Fixes
Fermentation Won’t Start
- Temperature too low — move to a warmer spot (18-22°C)
- Campden tablet still active — if you added a Campden tablet, wait a full 24 hours before adding yeast. The sulphite needs time to dissipate
- Dead yeast — old yeast packets lose viability. Check the expiry date and buy fresh from a homebrew supplier like The Malt Miller or Brew2Bottle
Fermentation Stuck Partway
The hydrometer reads above 1.010 but bubbling has stopped. Common causes:
- Temperature drop — move to a warmer spot
- Yeast nutrient deficiency — add another teaspoon of yeast nutrient
- Alcohol tolerance reached — if starting gravity was very high, the yeast may have reached its limit. Either accept a sweeter wine or pitch a more alcohol-tolerant yeast (Lalvin EC-1118 handles up to 18%)
Wine Won’t Clear
- Pectic haze — you forgot the pectic enzyme, or the fruit was high in pectin (apples, plums). Add pectic enzyme to the demijohn and wait 2-3 weeks
- Protein haze — particularly common with apple wines. Bentonite fining agent (about £3) usually clears this within a week
- Still fermenting — check with a hydrometer. If it’s still above 1.000, fermentation isn’t complete. Wait
Off-Flavours
- Vinegar taste — acetobacter contamination from exposure to air. If mild, it may age out. If strong, the batch is vinegar (use it for cooking — seriously, blackberry vinegar is excellent)
- Egg/sulphur smell — hydrogen sulphide from stressed yeast. Rack immediately — contact with copper (a copper coin dropped in briefly) can help
- Cardboard taste — oxidation from too much air contact during racking. More careful siphoning next time
Blending and Flavour Combinations
Single-fruit wines are great, but blending opens up possibilities. Some combinations that work well:
- Blackberry and apple — the apple lightens the blackberry and adds crispness. Use a 60:40 blackberry-to-apple ratio
- Elderflower and gooseberry — floral notes on a dry, tart base. Makes an exceptional summer wine
- Rhubarb and strawberry — the rhubarb’s tartness balances the strawberry’s sweetness. Classic combination
- Damson and sloe — deep, rich, and intense. Needs a year’s ageing but rewards patience
- Apple and pear — mild and easy-drinking. Good for people who think they don’t like homemade wine
Blend before or after fermentation — both approaches work. Blending before gives a more integrated result. Blending after lets you taste and adjust the balance precisely.
Bottling and Ageing
When to Bottle
Bottle when all three conditions are met:
- Fermentation is complete — hydrometer reads 0.996-1.000 for dry wines. No bubbles in the airlock for at least 2 weeks
- Wine is clear — you should be able to read text through the demijohn (or close to it). Cloudy wine bottles will develop sediment
- Wine tastes clean — no obvious off-flavours. Minor harshness is fine — that’s what ageing fixes
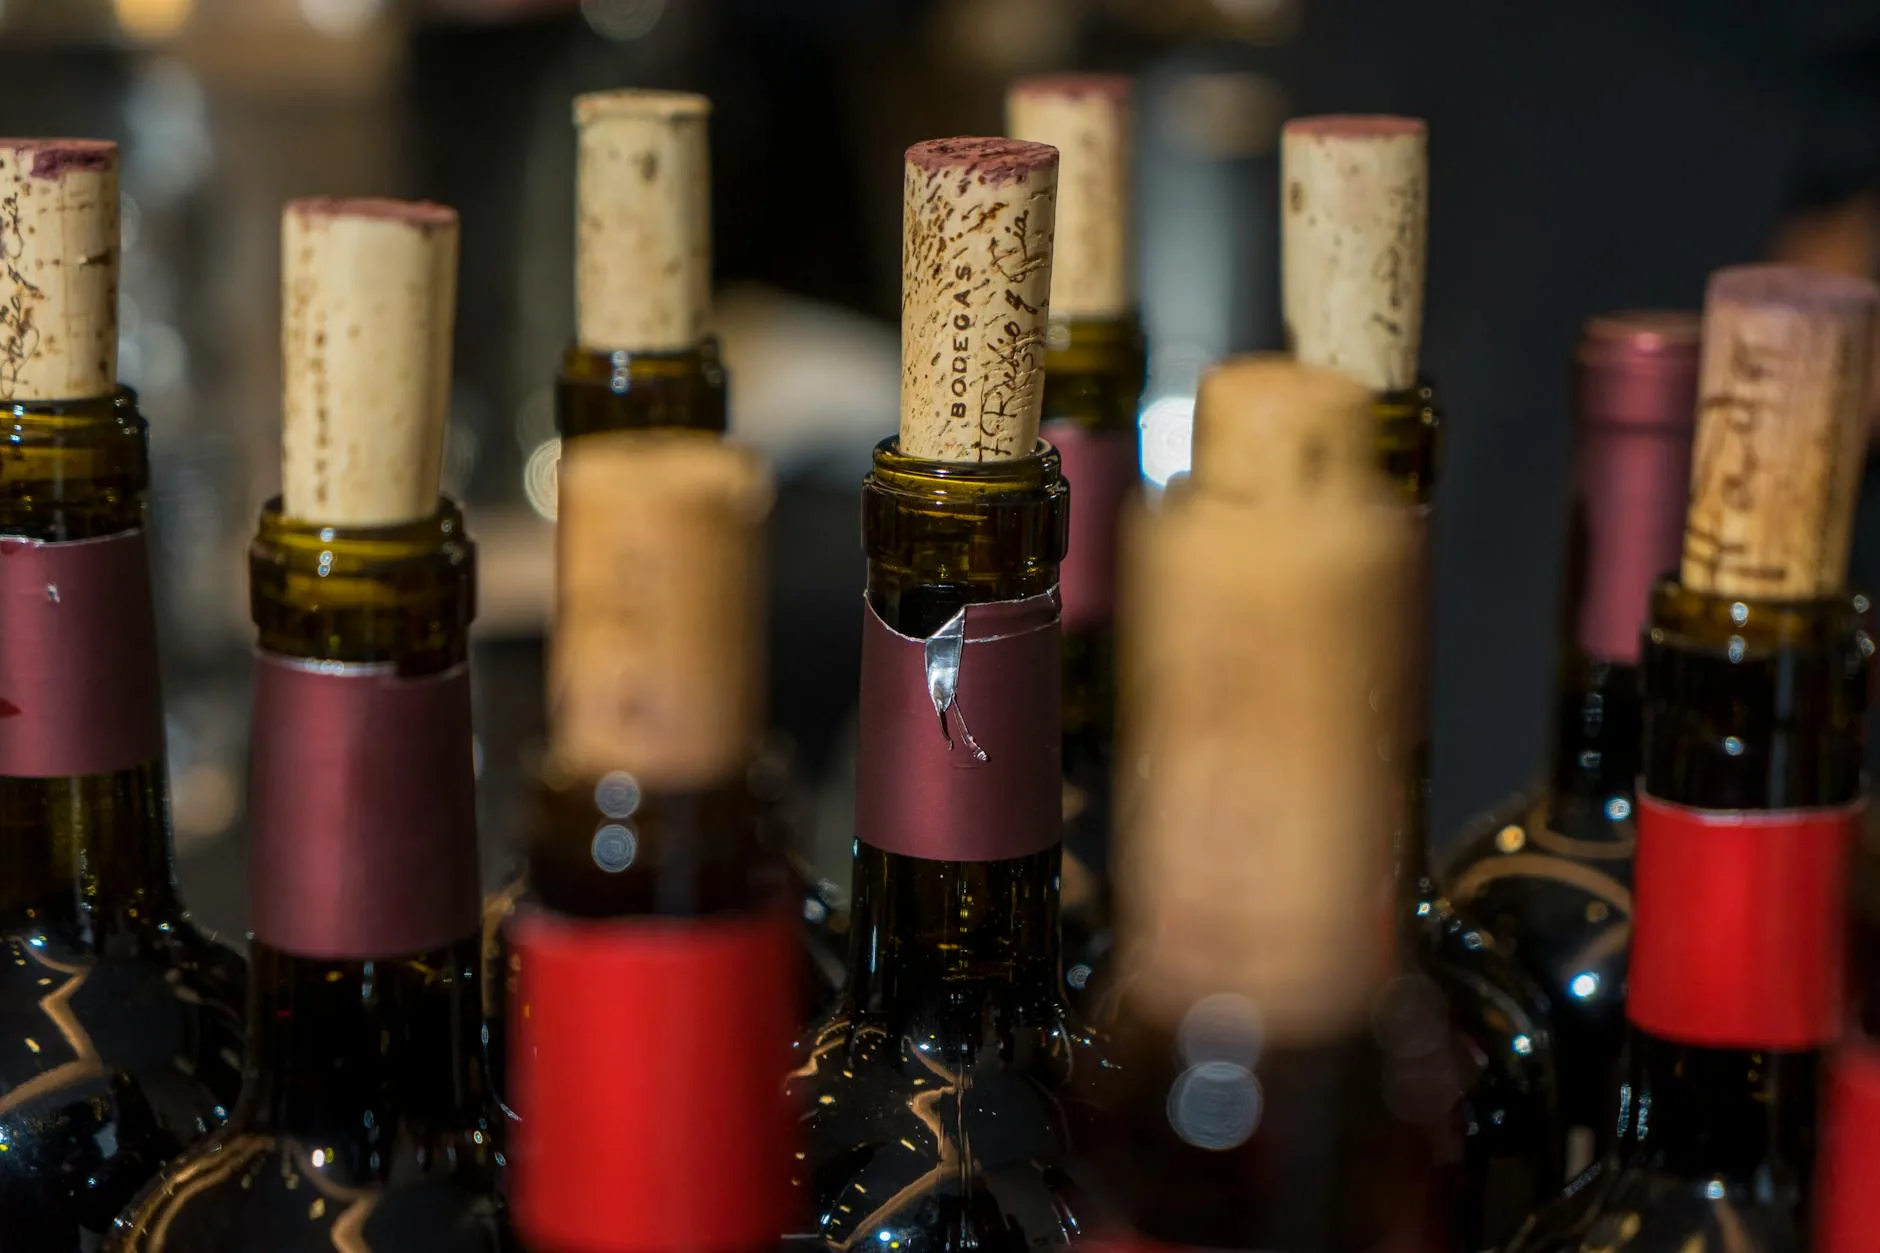
Bottling Process
- Sterilise bottles, corks, and siphon
- If you want a slightly sweet wine, add potassium sorbate (wine stabiliser) before sweetening — otherwise the residual yeast will re-ferment the added sugar in the bottle
- Siphon the wine into bottles, leaving about 2cm of headspace below the cork
- Cork firmly — a double-lever corker (about £10-15) makes this much easier than a hand corker
- Store bottles on their sides in a cool, dark place
How Long to Age
- Elderflower/strawberry — drink within 6-12 months. These light wines don’t improve much with age
- Apple/gooseberry/rhubarb — 6-12 months minimum. Better at 12-18 months
- Blackberry/plum/damson — 12 months minimum. Best at 18-24 months. These wines transform with age — the harsh tannins soften and complex flavours develop
- Parsnip/root vegetable wines — 18-24 months. These need the most ageing but can be remarkable
The hardest part of winemaking is waiting. After six batches, I’ve learned to always make more than I think I need — that way there’s always something ready to drink while the good stuff ages.
Frequently Asked Questions
How long does homemade fruit wine take to make? From fruit to drinkable wine, expect 3-6 months minimum. Primary fermentation takes about a week, secondary fermentation and clearing take 2-3 months, and most fruit wines benefit from at least 3 months in bottle before drinking. Rich wines like blackberry and damson improve for up to 2 years.
Can I use frozen fruit for wine? Yes — freezing actually helps by breaking down the cell walls, which releases more juice and flavour. Thaw the fruit completely before adding it to the must. Frozen garden fruit works just as well as fresh, so if you have a glut in summer, freeze the excess for winemaking whenever you’re ready.
Do I need special yeast or can I use bread yeast? Wine yeast is strongly recommended. Bread yeast technically works but produces rougher flavours, higher levels of off-flavours, and has a lower alcohol tolerance. A sachet of proper wine yeast costs about £1-2 and makes a noticeable difference to the finished product. Lalvin EC-1118 or Gervin GV1 are reliable all-rounders.
How do I know when fermentation is finished? Use a hydrometer. Take a reading, wait 3 days, take another. If both readings are the same (typically 0.996-1.000 for a dry wine), fermentation is complete. Don’t rely on airlock activity alone — a slow leak around the bung can make it look like fermentation has stopped when it hasn’t.
Why is my fruit wine cloudy? The most common cause is pectic haze from high-pectin fruits like apples and plums. Adding pectic enzyme before fermentation usually prevents this. If the wine is already cloudy, add pectic enzyme to the demijohn and wait 2-3 weeks. Bentonite fining agent is another option for persistent haze. Time alone sometimes clears it — patience is a winemaker’s best tool.