Choosing between homebrew carbonation methods is mostly a packaging decision: bottles favour priming sugar, kegs favour CO2, and pressure barrels sit awkwardly in the middle. The wrong choice can leave a good beer flat, foamy or annoyingly inconsistent, so it is worth deciding before you transfer a drop.
In This Article
- Homebrew Carbonation Methods: The Quick Answer
- Priming Sugar: Cheap, Flexible and Still the Best Bottle Method
- Carbonation Drops: Convenient, but Less Precise
- Natural Carbonation in Barrels and Kegs
- Force Carbonation with CO2
- Pressure, Temperature and Beer Style Targets
- Common Carbonation Problems and Fixes
- My Practical Recommendations by Budget
- Frequently Asked Questions
Homebrew Carbonation Methods: The Quick Answer
For most UK brewers, the best first choice is still priming sugar in bottles. It costs pennies per batch, needs no gas cylinder, and works with the bottles you probably already bought in a starter kit. The trade-off is time: expect roughly two weeks warm, then more time cool, before the beer tastes settled.
If you already keg, force carbonation is the neatest answer. It gives the most control, saves waiting time, and lets you adjust carbonation for different beer styles. It also means buying a Corny keg, CO2 cylinder, regulator and lines, so the real entry cost is closer to £180-£320 than the price of a single shiny keg.
Natural carbonation in pressure barrels or kegs is the middle option. It is cheaper than full CO2 force carbonation, especially if you already own a plastic barrel, but it can be less predictable. In my notes, the beers that behaved best were lower-pressure British styles: bitter, mild, porter and simple pale ale. The ones that caused more faff were lively wheat beers and hop-heavy styles where foam control matters.
| Method | Best for | Typical UK cost | Main drawback |
|---|---|---|---|
| Priming sugar | Bottles and mixed small batches | £1-£4 per batch | Needs careful measuring |
| Carbonation drops | Simple 500ml bottle batches | £2.45-£5.50 per batch | Less control over fizz level |
| Pressure barrel | Low-carbonation ales | £35-£75 for the barrel | Can lose pressure near the end |
| Natural keg carbonation | Keg owners who can wait | £65-£95 for a used 19L keg | Slow and less adjustable |
| Force carbonation | Precise, repeatable kegged beer | £180-£320 setup | Higher upfront spend |
The quick rule: bottle brewers should use sugar, impatient keg brewers should use CO2, and anyone using a pressure barrel should keep the carbonation modest.
Priming Sugar: Cheap, Flexible and Still the Best Bottle Method
Priming sugar works because there is still enough yeast left in finished beer to ferment a small measured dose of sugar inside a sealed bottle. That creates CO2, the CO2 dissolves into the beer, and the bottle conditions at the same time. It is simple, but not casual. A few grams too much is the difference between a lively pour and a kitchen-ceiling incident.
Bulk priming vs bottle priming
Bulk priming means dissolving sugar in boiled water, gently mixing it into the whole batch, then bottling. Bottle priming means dosing each bottle separately with sugar or drops. I prefer bulk priming for 20L beer batches because every bottle gets the same treatment, but it only works if you can stir gently without splashing oxygen into the beer.
Bottle priming is slower on bottling day, yet useful when you are packaging odd bottle sizes. A 330ml bottle, 500ml bottle and 750ml swing-top do not need the same sugar dose. This is where a calculator earns its place. The Brewfather carbonation tool covers both priming sugar and force-carbonation pressure, so you can adjust sugar type, beer temperature and target fizz instead of guessing.
What sugar to use
Plain white granulated sugar works. Brewing sugar, usually dextrose, also works and is sold by UK homebrew shops for about £3-£5 per kilo. The difference in flavour at priming quantities is tiny. I would spend the money on better caps, a no-rinse sanitiser or a decent bottling wand before paying a premium for priming sugar.
Useful UK options:
- Granulated sugar: about £1-£1.50 per kilo from a supermarket, fine for most beer.
- Brewing sugar/dextrose: about £3-£5 per kilo from The Malt Miller, Brew2Bottle or local homebrew shops.
- Spray malt: about £6-£9 for 500g, useful if you want all-malt conditioning, but slower and less tidy.
- Digital scales: £8-£15 from Amazon UK or Lakeland, more important than the sugar brand.
Where priming sugar is weakest
Priming sugar is poor when you need fast, precise results. It also depends on healthy yeast. Very strong beers, long-aged beers and beers that have been heavily fined or filtered can carbonate slowly. If you are brewing a 4.2% pale ale from a kit, no problem. If you are bottling a 9% imperial stout after months in secondary, I would consider adding a tiny amount of fresh bottling yeast rather than hoping tired yeast wakes up.
For a full bottling-day process, keep this article focused on the decision and use the dedicated bottle and carbonate homebrew guide for the step-by-step transfer, cap and conditioning routine.

Carbonation Drops: Convenient, but Less Precise
Carbonation drops are boiled sugar tablets. You put one or two in a bottle, fill the bottle, cap it, and let the yeast do the rest. That convenience is the whole point. Brew2Bottle sells carbonation drops at about £2.45, Dark Rock lists 80 drops at £2.99, and Mangrove Jack’s drops are often around £5.19 from The Malt Miller.
The catch is control. Drops are designed around common bottle sizes, not your exact beer style. A bitter, a Belgian-style wheat beer and a cider do not all want the same carbonation level. Drops will get you drinkable fizz, but they will not fine-tune a best bitter to pub-style softness or a saison to lively sparkle.
When drops make sense
Use drops when speed and simplicity matter more than precision. They are good for a first batch, for small experimental brews, or for bottling with children helping in the kitchen, assuming the caps and glass stay with the adult. No loose sugar, no sticky funnel, no notebook covered in syrup.
They also remove one common beginner mistake: forgetting to mix the priming solution evenly. I have tasted batches where the first bottles were flat and the last few were gushers because the sugar syrup sat in a layer at the bottom of the bucket. Drops avoid that exact problem.
When I would avoid them
Avoid drops if you use mixed bottle sizes or care about matching a style closely. Cutting tablets in half is fiddly, and guessing tablet counts for 330ml bottles gets old quickly. Loose sugar and a calculator are better.
They are also expensive per gram. The difference is small in the context of one batch, but it is obvious over a year of brewing. If you bottle regularly, a £10 set of scales plus supermarket sugar pays for itself.
Natural Carbonation in Barrels and Kegs
Natural carbonation means using yeast and sugar to create CO2 inside a sealed serving vessel rather than adding gas from a cylinder. It can happen in a plastic pressure barrel, a 5L mini keg or a 19L Corny keg. The beer carbonates as it conditions, which is why traditional British ale styles suit it so well.
Pressure barrels
A basic 25L pressure barrel costs about £35-£55 in the UK. King Keg and budget barrel options can sit higher, around £55-£75 depending on tap and cap style. You add priming sugar, seal the barrel, keep it warm for conditioning, then move it cool for serving.
The strength of a barrel is convenience. No washing 40 bottles. No crown caps. One vessel sits in the garage, utility room or under the stairs. The weakness is pressure control. Barrels are not built for high carbonation, and many rely on small CO2 bulbs to maintain serving pressure once you have pulled several pints.
Use barrels for:
- English bitter and mild: low fizz suits the style and the serving pace.
- Porter and brown ale: enough carbonation for lift without harsh foam.
- Garden-party beer: one vessel is easier than carrying crates of bottles.
Do not use a pressure barrel for a highly carbonated wheat beer unless you enjoy mopping.
Natural carbonation in Corny kegs
You can prime a Corny keg with sugar, then use CO2 only to seal the lid and dispense. This saves gas and gives a softer carbonation than forced gas alone. It is also useful if you have a keg but not a permanent fridge setup yet.
The usual warning is to use less sugar than you would for bottles. A keg has less headspace per serving and is easier to overdo. Many brewers use roughly half to two-thirds of a bottle-priming dose, then adjust next time. This is one of those jobs where keeping records matters; your own fridge temperature, beer style and serving line length change the result. The homebrew record-keeping guide is dull until it saves a batch. Then it becomes your favourite boring habit.
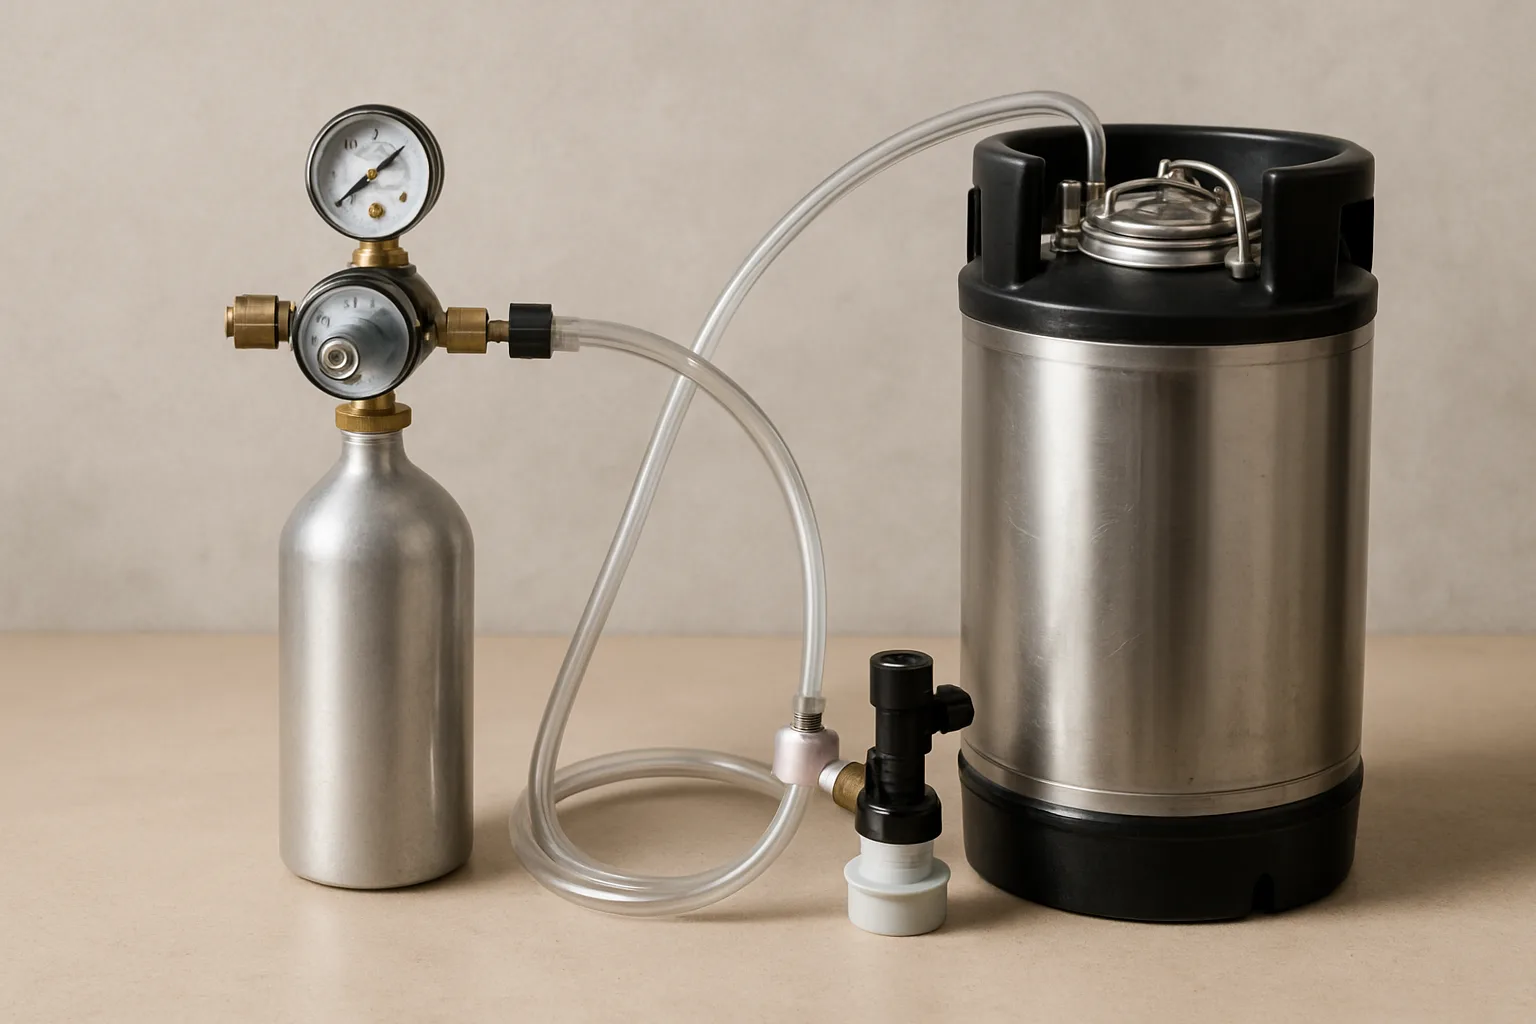
Force Carbonation with CO2
Force carbonation uses external CO2 to dissolve gas into cold beer inside a keg. It is faster, cleaner and more repeatable than natural carbonation. It is also the method that makes most sense once you have committed to a keg fridge or kegerator.
What you need
A realistic UK starter setup looks like this:
- 19L Corny keg: about £65-£95 used/refurbished, or £95-£130 new.
- CO2 regulator: about £40-£70; Love Brewing lists a Cornelius keg regulator around the low-£40s when discounted.
- CO2 cylinder: often £25-£45 refill or exchange, but first-time cylinder deposits can push the first bill higher.
- Gas disconnect and beer disconnect: roughly £6-£12 each.
- Beer and gas line: about £1-£3 per metre, with John Guest or Duotight fittings adding more.
- Keg fridge or temperature-controlled space: anything from a used £40 fridge to a purpose-built £400+ kegerator.
If that feels like a lot, it is. The best reason to force carbonate is not that it is cheap. It is that it turns carbonation from a two-week hope into a controllable process.
Set-and-wait vs burst carbonation
Set-and-wait is the method I trust. Chill the beer, set the regulator to the pressure you want, and leave it connected for several days. It is slower than shaking the keg, but it is much harder to overdo. Use a carbonation calculator here because force carbonation depends on temperature and pressure together, not pressure alone.
Burst carbonation is the impatient route: higher pressure for a shorter time, sometimes with rolling or shaking the keg. It works, but it punishes distraction. Leave a keg too long at high pressure and you get foam, not beer. I only use burst carbonation when a beer is for a known date and I can check it.
The biggest practical advantage
Force carbonation lets you fix things. If a keg is too flat, raise the pressure and give it more time. If it is too fizzy, vent it and serve at a lower pressure. Bottles do not give you that option. Once the cap is on, you are mostly waiting and hoping.
That is why force carbonation pairs well with the beginner kegging setup. The kegging kit does not make better beer by magic, but it makes packaging faults easier to correct.
Pressure, Temperature and Beer Style Targets
Carbonation is not one fixed target. A cask-style bitter wants gentle lift. A German wheat beer wants a lively head. A stout may want smoothness more than fizz. If every beer gets the same carbonation, some will taste wrong even when fermentation was perfect.
Temperature changes everything
Cold beer absorbs CO2 more readily than warm beer. That matters for force carbonation because 12 psi at 4°C does not behave like 12 psi at 12°C. It also matters for bottle conditioning because warm storage helps yeast carbonate the beer, but cool storage helps the CO2 settle into the liquid and gives the beer a cleaner pour.
My simple rhythm for bottles is warm first, cool second: around 18-21°C for conditioning, then a cooler place for at least a few days before judging the batch. Opening a warm test bottle after four days tells you very little, apart from the fact that patience is annoying.
Style targets in plain English
You do not need to memorise volumes of CO2, but you do need a feel for style:
- British bitter, mild and porter: low to moderate carbonation; too much fizz makes them sharp.
- Pale ale and IPA: medium carbonation; enough lift for hops without foam chaos.
- Wheat beer and saison: higher carbonation; bottles must be suitable and priming must be measured carefully.
- Stout: moderate carbonation unless you are building a nitrogen-style dispense setup, which is a separate rabbit hole.
For bottles, stay conservative until you trust your process. For kegs, you can adjust. That single difference should shape the method you choose.
Common Carbonation Problems and Fixes
Carbonation problems usually come from measurement, temperature, yeast health or leaks. The method gets blamed, but the fault is often in the detail around it.
Flat beer
Flat bottles usually mean not enough sugar, poor mixing, cold conditioning, tired yeast or a poor seal. Move a couple of bottles somewhere warmer for a week before doing anything drastic. If every bottle is flat and there is no hiss at all, check caps and sugar records first.
Flat kegged beer is easier. Check the cylinder, regulator, disconnects and lid seal. Spray starsan solution around the posts and lid; bubbles show a leak. A £3-£6 pack of spare O-rings is worth keeping in the drawer because old seals waste gas and patience.
Gushers
Gushers are more serious. They can come from too much priming sugar, uneven sugar mixing, bottling before fermentation finished, or infection. If the beer tastes sour, phenolic or strange, do not pretend it is just lively. If it tastes normal but pours like a fountain, chill the bottles hard before opening and pour into a jug.
The prevention is boring but reliable: stable gravity readings, clean equipment, accurate scales and full mixing. The common homebrew mistakes guide covers the fermentation and sanitation side in more detail.
Uneven bottles
Uneven carbonation across one batch usually points to poor priming distribution. This is where bulk priming can help, as long as you mix gently. If you dose each bottle by hand, use a proper scoop or scales rather than a random kitchen teaspoon.
I have also seen swing-top bottles cause inconsistent results when seals are old. Replacement rubber seals cost about £3-£6 for a pack and are cheaper than losing half a batch to lazy closures.
My Practical Recommendations by Budget
If you are new to brewing, do not buy a full kegging setup for your first beer. Spend the money on process first: sanitiser, a hydrometer, decent bottles, a bottling wand and accurate scales. Carbonation improves quickly when your basic packaging routine is calm.
Under £20: bottle properly
Buy digital scales (£8-£15), crown caps (£2-£4 per 100), and brewing sugar or supermarket sugar. Use bottles you already own or buy a case of reusable amber bottles for roughly £12-£25 depending on size and condition. This is the best value route for kit beers and small batches.
Pair it with the bottling equipment guide if your current setup is a siphon, crossed fingers and a sticky floor.
£35-£90: pressure barrel or better bottling kit
A pressure barrel makes sense if you brew British ale styles and want fewer bottles. Budget around £35-£75 for the barrel, plus a few pounds for CO2 bulbs if your cap supports them. I would not choose it for fizzy lager-style beer, but for bitter it can feel pleasantly pub-like.
If you prefer bottles, use this budget for a bench capper, bottle tree, no-rinse sanitiser and enough matching bottles. That will improve more batches than a gadget you only use once.
£180-£320: force carbonation setup
This is the point where CO2 makes sense. A used Corny keg, regulator, gas line, disconnects and cylinder can land around £180 if you buy carefully. A neater setup with new parts, better fittings and a fridge pushes nearer £300 or more. The homebrew kegging kits guide is the place to compare complete setups rather than piecing everything together blind.
My preference is simple: bottle with priming sugar until you know you will keep brewing, then move to force carbonation when packaging becomes the bottleneck. Do not buy a keg setup to rescue weak beer. Buy it when your beer is good enough that you want serving to be easier.
Frequently Asked Questions
What is the easiest homebrew carbonation method? Carbonation drops are easiest because you add them directly to bottles, but priming sugar is nearly as simple once you have scales and gives better control.
Is force carbonation better than priming sugar? Force carbonation is better for control and speed, especially in kegs. Priming sugar is better for low-cost bottling and does not need CO2 equipment.
How long does bottle carbonation take? Most normal-strength beers need about two weeks warm, often around 18-21°C, followed by cool storage before they pour cleanly. Strong beers can take longer.
Can I use normal sugar to carbonate beer? Yes. Plain white granulated sugar works for priming. Brewing sugar is tidy and dissolves well, but the flavour difference at priming levels is usually tiny.
Why is my homebrew over-carbonated? Common causes are too much priming sugar, uneven mixing, bottling before fermentation finished, infection, or force carbonating at too high a pressure for too long.
Should beginners buy kegging equipment straight away? Usually no. Beginners are better starting with bottles, sugar, scales and a good cleaning routine. Kegging is worth it once you know you will brew regularly.