Session IPAs have become a staple for UK craft beer lovers, offering the hop-forward punch of a classic IPA but with a lower alcohol content. This means you can enjoy a few pints with friends or at a summer barbecue without feeling the effects of a stronger brew. Crafting a session IPA recipe homebrew is both a rewarding challenge and an opportunity to experiment with hops, malts, and techniques that maximise flavour while keeping the ABV in check. In this complete guide, you’ll find everything you need to brew a world-class session IPA at home, tailored for UK ingredients, equipment, and tastes.
In This Article
- What Makes a Good Session IPA
- Session IPA Recipe Homebrew Targets
- Ingredients and Recipe
- Mash, Boil and Hop Schedule
- Fermentation and Dry Hopping
- Packaging: Bottle or Keg
- Tweaks for More Flavour Without More Alcohol
- Common Session IPA Mistakes
- Frequently Asked Questions
What Makes a Good Session IPA
A great session IPA is all about balance: vibrant hop aroma, a crisp and refreshing finish, and enough body to avoid tasting thin. The goal is to deliver the intensity of a full-strength IPA in a package that sits comfortably between 3% and 4.5% ABV. In the UK, session beers have a long tradition, but the session IPA is a modern, hop-driven evolution.
Balancing Body and Drinkability
One of the biggest challenges in brewing a session IPA is maintaining a satisfying mouthfeel. With less alcohol and residual sugar, the beer can easily become watery. To counteract this, UK homebrewers often add carapils, wheat malt, or a small portion of oats. These grains help create a fuller mouthfeel and improve head retention. If you’re aiming for a hazy, New England-style session IPA, a modest amount of oats (100–200g per 23L batch) can add that signature haze and silky texture, but don’t overdo it or the beer will become slick.
Layered Hop Character
Session IPAs should be bursting with hop aroma and flavour, but not so bitter that they become harsh. The best examples use a blend of late kettle additions and dry hopping to capture the full spectrum of hop oils. American and New World hops like Citra, Mosaic, and Simcoe are popular, but UK-grown varieties such as Jester and Olicana can add unique, fruity notes. The key is to focus on late and dry hopping, not just bittering additions, to maximise aroma and flavour.
Lower ABV, Full Flavour
Reducing the alcohol content doesn’t mean sacrificing taste. In fact, a well-brewed session IPA can be just as satisfying as its stronger cousins. Keeping the ABV down also helps you stay within recommended alcohol units—see Drinkaware’s UK unit guidance for more information on responsible drinking.
Session IPA Recipe Homebrew Targets
Before you start brewing, it’s important to set clear targets for your session IPA recipe homebrew. These benchmarks help you design your recipe, brew consistently, and troubleshoot any issues that arise.
- Original Gravity (OG): 1.038 – 1.045
- Final Gravity (FG): 1.008 – 1.012
- ABV: 3.5% – 4.2%
- IBU: 35 – 45 (enough for balance, not harsh)
- SRM (colour): 4 – 6 (pale gold to light amber)
- Carbonation: 2.3 – 2.6 vols (moderately spritzy)
Why These Targets Matter
A session IPA with too low an OG will taste watery and lack body. Too high, and you’re drifting into pale ale territory. Bitterness is crucial: too little, and the beer seems sweet or flabby; too much, and it’s harsh without the malt to balance it. These ranges work well for most UK homebrew setups.
Adjusting for Your System
Every homebrew kit is a bit different. If you’re brewing on a Grainfather or similar all-in-one system, you may need to tweak your efficiency expectations. For stove-top BIAB (brew in a bag), expect slightly lower efficiency and adjust your malt bill accordingly.

Ingredients and Recipe
A well-designed session IPA recipe homebrew starts with quality ingredients. Here’s a typical 23L (UK standard) batch size. You can scale up or down as needed. All weights are for all-grain brewing; extract brewers can substitute as needed.
Malt Bill (for 23L)
- 3.0 kg Maris Otter pale malt (base)
- 300 g Vienna or Munich malt (adds depth)
- 200 g Carapils (body and head retention)
- 200 g Wheat malt (softness, foam)
Optional: Up to 200g flaked oats for mouthfeel if you enjoy a hazier pint.
Hop Schedule
- 15g Magnum (or Admiral) at 60 min (clean bittering)
- 20g Citra at 10 min
- 20g Mosaic at 5 min
- 40g Citra + 40g Mosaic at flameout (steep for 20 min below 80°C)
- 60g Citra + 40g Mosaic for dry hop (see dry hopping section)
UK-grown hops like Jester or Olicana can be substituted for part of the late or dry hops for a local twist. Blending can produce excellent results.
Yeast
- US-05, Lallemand New England, or Mangrove Jack’s M44
Refer to the Brewing Yeast Guide: Which Strain for Which Beer? for more UK-available options. Always check yeast pitching guidance for the right amount to use.
Water Profile
Aim for a chloride-to-sulphate ratio around 2:1 for a softer, rounder mouthfeel. If you’re new to water treatment, start simple: half a Campden tablet per 23L to remove chlorine, and add 5g calcium chloride to the mash.
Mash, Boil and Hop Schedule
The mash and boil steps are where you lock in body, fermentability, and hop character. Here’s how to approach it, with tips for UK ingredients and kit.
Mash Steps
- Heat strike water to 72°C (allowing for grain temperature drop)
- Mash in at 66°C for 60 minutes (keeps a bit more body than a typical pale ale)
- Mash out at 75°C for 10 minutes (optional, helps with lautering)
If you’re using a BIAB set-up, a single infusion at 66°C is fine. For a slightly drier beer, mash at 65°C. For a rounder mouthfeel, go up to 67°C.
Boil Steps
- Bring wort to a rolling boil (watch for foam—wheat and oats can cause boil-overs)
- Add bittering hops at 60 min
- Add late hops at 10 min and 5 min
- Add flameout hops at switch-off, then whirlpool/steep for 20 minutes below 80°C
A hop spider for late additions keeps transfer clean. Magnetic stirrers or a good old spoon will help with whirlpooling if your system allows.
Hop Management Tips
- Don’t overdo bittering hops: with less malt, too much early bitterness can overwhelm
- Prioritise late and flameout additions for aroma
- Keep flameout/whirlpool below 80°C to preserve hop oils
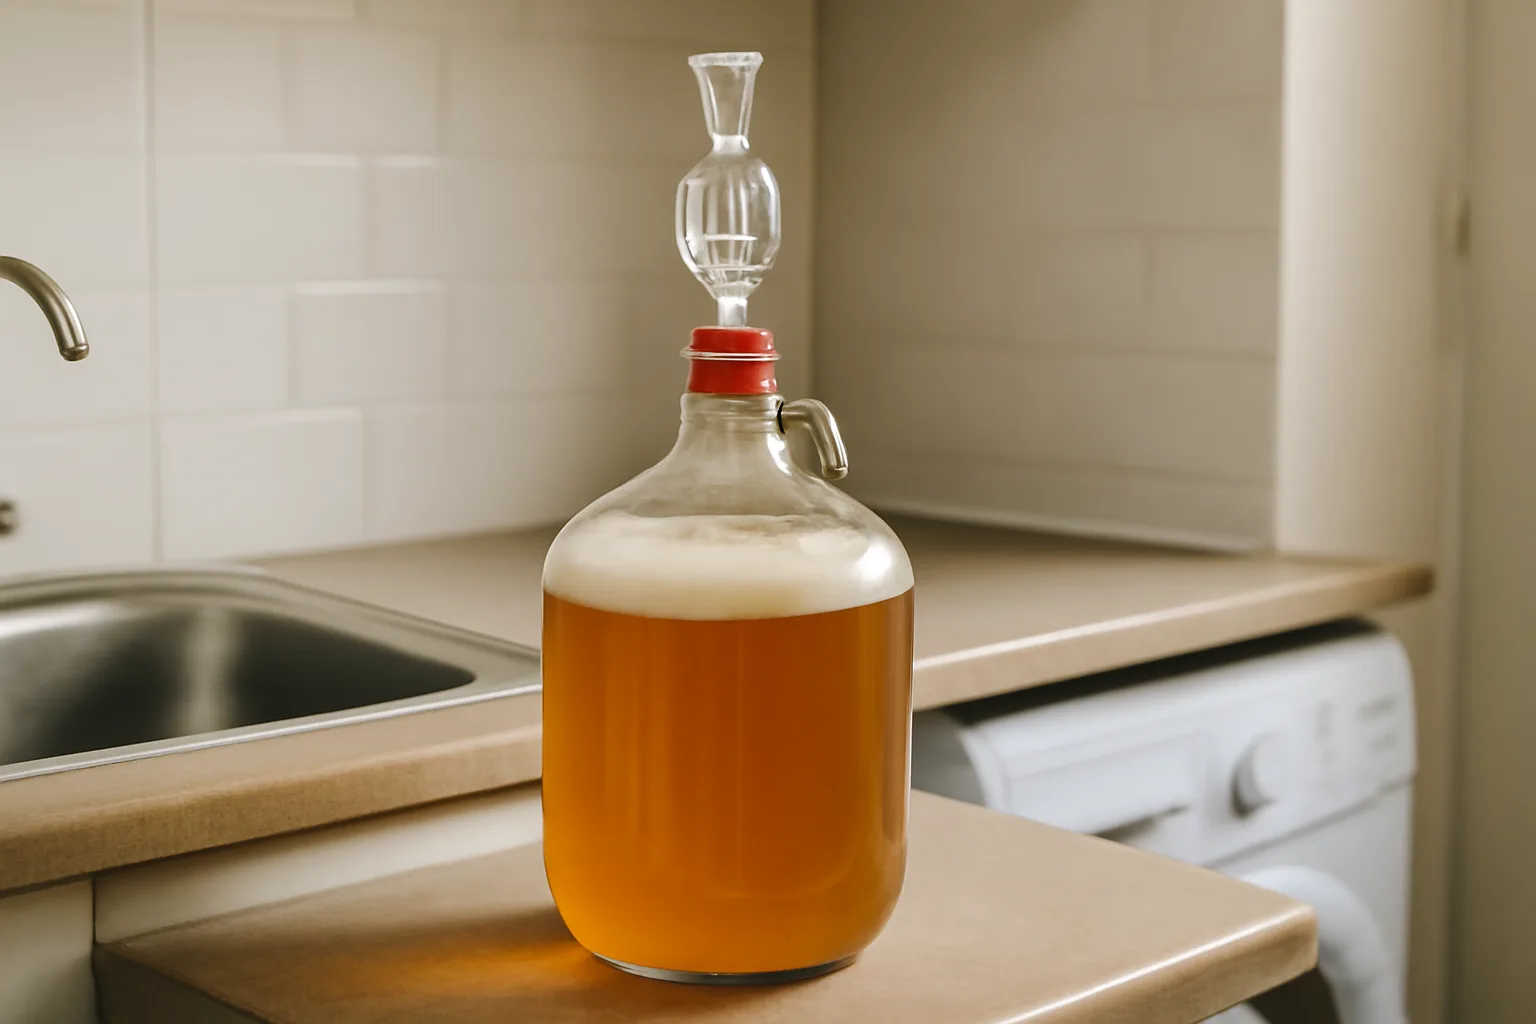
Fermentation and Dry Hopping
Fermentation is where your session IPA develops its balance and aroma. Lower ABV beers can be more sensitive to yeast stress, so good practices are vital.
Temperature Control
Ferment session IPAs at 18–20°C for clean yeast character. If you’re using a New England strain and want a touch more fruitiness, go up to 21–22°C. Avoid fluctuating temperatures if possible—this can lead to off-flavours, especially in lower gravity beers.
Dry Hopping Schedule
- Add dry hops after primary fermentation slows (about day 4–5), or when gravity is within 2 points of expected FG
- Use a mesh bag or stainless steel hop tube for easy removal
- Steep for 3–4 days at 18–20°C, then cold crash (if you can) for 24–48 hours
Dry hopping can introduce oxygen, so minimise splashing. Purge the headspace with CO2 if kegging, but this isn’t always possible with bottles.
Yeast Health
Pitch a full pack of dry yeast or a healthy starter. Underpitching is a common mistake with lower gravity beers—refer to yeast pitching guidance for best results.
Packaging: Bottle or Keg
How you package your session IPA recipe homebrew affects freshness and hop character. Both bottling and kegging have trade-offs in the UK homebrew context.
Bottling Pros and Cons
- Pros: Accessible, portable
- Cons: Higher risk of oxygen pickup, longer conditioning, hop aroma fades faster
If bottling, use high-quality crown caps and bottles. Prime with 120g table sugar for 23L for a moderate fizz. Purging bottles with CO2 is ideal, or fill from the bottom up to reduce oxygen.
Kegging Pros and Cons
- Pros: Faster carbonation, better oxygen control, hop aroma lasts longer
- Cons: Upfront cost, space required
Kegging is preferred for session IPAs, as it preserves hop aroma and makes serving easier. For a full guide, see How to Keg Homebrew: A Beginner’s Guide.
Carbonation and Conditioning
- Carbonate to 2.3–2.6 vols for a lively but not fizzy pint
- Chill for at least a week before drinking; session IPAs are best fresh, but a short rest helps settle haze
Tweaks for More Flavour Without More Alcohol
Session IPA brewing is all about squeezing out as much hop character as possible while keeping the beer balanced and drinkable. Here are ways to push flavour without bumping up the ABV.
Boosting Aroma
- Increase dry hop charge (but not so much as to cause grassy flavours)
- Split dry hop additions: half mid-fermentation, half post-fermentation
- Use hop oils or extracts for a punchy nose (available from UK homebrew shops)
Adjusting Malt for Balance
- Swap some base malt for Vienna or Munich for a richer backbone
- Try a touch of light crystal (not more than 100g per 23L) for sweetness if your beer seems too dry
- Flaked oats, wheat, or rye can add body, but go easy—too much and you’ll get a slick mouthfeel
Playing with Yeast
- Use a fruity English strain for more ester character (see Brewing Yeast Guide: Which Strain for Which Beer?)
- For gluten-free options, see How to Brew Gluten-Free Beer
Water Tweaks
- Bump up chloride for a rounder, softer mouthfeel
- Keep sulphate moderate, or the bitterness can seem harsh
Common Session IPA Mistakes
Even experienced brewers sometimes miss the mark with session IPAs. Here are the most common mistakes UK homebrewers make, and how to avoid them.
Underwhelming Body
Using only pale malt can result in a thin, watery beer. Always include some carapils, wheat, or oats for body, and mash a bit higher.
Overbittering
With less malt, bitterness stands out. UK brewers sometimes use too much early boil hops, thinking they need more IBUs. Focus on late and flameout additions for flavour instead.
Oxygen Pickup
Session IPAs are sensitive to oxidation, which kills hop aroma and gives a stale taste. Always minimise splashing after fermentation. If bottling, fill gently and cap quickly.
Hop Creep
Late dry hopping can restart fermentation, leading to overcarbonation in bottles. If you dry hop after FG is reached, give the beer a couple of days to settle before packaging.
Not Brewing to Style
Some UK brewers get carried away with adjuncts or high ABV. For competitions, stick to the session IPA guidelines—see How to Enter Homebrew Competitions in the UK for tips.
I would also keep this job connected to the rest of the setup: Country Wine Recipes: Elderflower, Blackberry & More covers the next decision point in more detail, so it is worth reading alongside this guide: Country Wine Recipes: Elderflower, Blackberry & More.
Ingredient Sourcing and Local Adaptations
Choosing the right ingredients is key to nailing a session IPA recipe homebrew that stands out on both flavour and drinkability. In the UK, access to fresh and interesting hops has never been better, with suppliers like The Malt Miller, Get ‘Er Brewed, and BrewUK offering a wide range of US and New World varieties, as well as some excellent British-grown options. While classic American hops like Citra, Mosaic, and Simcoe are popular for their bold citrus and tropical notes, don’t overlook UK-grown varieties such as Jester, Olicana, or Harlequin. These can provide unique aromas—think marmalade, gooseberry, and soft peach—that work brilliantly in a session IPA and support British hop farmers in the process.
For malt, Maris Otter remains a reliable base, imparting a gentle biscuit character that helps offset any potential thinness. Some brewers prefer extra pale malt for a lighter colour and cleaner profile, especially if they want the hops to shine. If you’re brewing on a budget, supermarket oats (the plain, unflavoured kind) work just as well as pricier homebrew-specific options for boosting body and haze.
Water Chemistry and Adjustments
Water makes up the bulk of any beer, and its mineral content can have a big impact on the finished pint. For a session IPA, aim for a chloride-to-sulphate ratio that slightly favours sulphate (around 2:3 chloride to sulphate by weight) to enhance hop brightness and crispness. If you’re brewing in a hard water area like much of southern England, consider diluting with a bit of bottled or filtered water and adding a Campden tablet to remove chlorine or chloramine, which can cause off-flavours. Simple water treatment kits or calculators are widely available online and can help you make sensible adjustments without overcomplicating things.
Practical Brewing Tips and Trade-Offs
Session IPAs are less forgiving of mistakes than higher-ABV beers. Any flaws—be they oxidation, fermentation issues, or poor sanitation—will be more apparent in a lower-alcohol brew. I always recommend being extra vigilant with cleaning and sanitising, especially at packaging. Oxygen is the enemy of hop-forward beers, so if you’re bottling, fill each bottle to the brim and cap quickly. If you keg, consider purging your keg with CO₂ before filling to minimise contact with air.
Temperature control during fermentation is another area where a little effort pays off. Most English ale yeasts and American strains like US-05 perform well between 18–20°C. If your brewing space fluctuates in temperature, a simple inkbird controller and a fridge or heat belt can make a big difference in consistency.
Scaling and Experimentation
One of the joys of homebrewing is tweaking recipes to suit your own preferences. If you find your session IPA lacking in hop aroma, try increasing the dry hop slightly or splitting it into two additions—one near the end of fermentation and one a day or two before packaging. If your beer feels thin, experiment with a touch more wheat or oats next time. Remember, every change comes with its own trade-offs: more hops can mean more haze and potential for grassy flavours if left too long, while extra body can mute hop brightness. Keep good notes so you can dial in your ideal balance over successive batches.
Lastly, don’t be afraid to share your session IPA with friends or local homebrew clubs. Honest feedback is invaluable, and you’ll quickly learn what tweaks make your beer stand out in the crowded world of hop-forward brews.
Frequently Asked Questions
Q1: Can I make a session IPA with extract kits? Yes, you can. Use a light or extra light malt extract as your base, and steep specialty grains (carapils, wheat, etc.) for body. Pay close attention to late and dry hopping, as extract beers benefit from extra aroma boosts.
Q2: How can I keep my session IPA from tasting watery? Mash a bit higher (66–67°C), use some wheat or oats, and avoid over-attenuative yeasts. A touch of specialty malt helps too.
Q3: What’s the best hop for a UK session IPA? Citra and Mosaic are popular, but UK-grown Jester and Olicana give a local twist. Blending US and UK hops creates layered aroma.
Q4: How soon should I drink a session IPA after brewing? Session IPAs are best young, as hop aroma fades quickly. Start sampling after 10 days in the keg or 3 weeks in bottles.
Q5: Can I make a gluten-free session IPA? Yes. Use gluten-free base malts and check out How to Brew Gluten-Free Beer for tips. Watch for haze and body—oats and wheat may not be suitable if you’re coeliac.
Q6: Is there a non-alcoholic version of session IPA? You can brew to very low ABV by mashing high, using special yeast, or removing alcohol post-fermentation, but flavour will be different. For true non-alcoholic, specialist yeast is required.